数据科学:工具篇(一)—— Jupyter Lab 配置环境

JupyterLab 是 Jupyter 团队为 Jupyter 项目开发的下一代基于 Web 的交互式开发环境。相对于 Jupyter Notebook,它的集成性更强、更灵活并且更易扩展。它支持 100 种多种语言,支持多种文档相互集成,实现了交互式计算的新工作流程。如果说 Jupyter Notebook 像是一个交互式的笔记本,那么 Jupyter Lab 更像是一个交互式的 VSCode。另外,JupyterLab 非常强大的一点是,你可以将它部署在云服务器,不管是电脑、平板还是手机,都只需一个浏览器,即可远程访问使用。使用 JupyterLab,你可以进行数据分析相关的工作,可以进行交互式编程,可以学习社区中丰富的 Notebook 资料。

本文只是提供一个 Jupyter lab 的基本配置思路和索引,Jupyter lab 还在快速发展,文中提到的很多内容可能已经不再适用了,大家在配置时不要拘泥于文中细节,还是要去官网上查看具体安装细节,否则可能导致版本兼容的各种问题

安装 Jupyter

建议先安装 Anaconda,Anaconda 自带 Jupyter 和常用的科学计算包,且方便通过 conda 进行环境管理。为了不污染本地 Python 环境,建议单独为 Jupyter lab 创建一个虚拟环境(在 base 环境下可能遇到各种奇怪的错误):

1
2
3
4
5
6
7
8
9
10
11
12
13
14
15
16
17
18
19
20
21
22
23
24
25
26
27
28
29
30
31
32
33
# 创建虚拟环境,同时安装完整anaconda集合包(假设已经成功安装了 Anaconda)
$ conda create -n mylab python=3.7 anaconda

# 激活虚拟环境
$ conda activate mylab

# 查看 Jupyter 版本
$ jupyter --version
jupyter core : 4.6.3
jupyter-notebook : 6.0.3
qtconsole : 4.7.5
ipython : 7.16.1
ipykernel : 5.3.2
jupyter client : 6.1.6
jupyter lab : 2.1.5
nbconvert : 5.6.1
ipywidgets : 7.5.1
nbformat : 5.0.7
traitlets : 4.3.3

# 查看相关路径
$ jupyter lab paths
Application directory: /Users/likewang/opt/anaconda3/share/jupyter/lab
User Settings directory: /Users/likewang/.jupyter/lab/user-settings
Workspaces directory: /Users/likewang/.jupyter/lab/workspaces

# 查看配置文件路径
$ jupyter notebook --generate-config
Overwrite /Users/likewang/.jupyter/jupyter_notebook_config.py with default config? [y/N]n

# 修改配置文件,设置 jupyter 默认打开的目录
$ vim .jupyter/jupyter_notebook_config.py
c.NotebookApp.notebook_dir = '/Users/likewang/ilab'

插件管理

jupyter-lab 提供了两种方式来管理 Jupyter-lab 的插件:

  • 命令行:
1
2
3
4
5
6
7
8
9
10
11
12
13
14
15
16
17
# jupyter-lab 运行插件需要先安装 nodejs
$ conda install nodejs

# 查询安装的插件
$ jupyter labextension list

# 安装插件
$ jupyter labextension install xxx

# 删除插件
$ jupyter labextension uninstall xxx

# 更新所有插件(当插件版本过低或与当前jupyter版本不兼容的时候很好用)
$ jupyter labextension update --all

# 构建插件
$ jupyter lab build
  • 通过 juputer-lab 插件图形化管理:进入jupyter界面,点击插件图标,在搜索栏中搜索对应插件名,如jupytext,可直接管理对应的插件

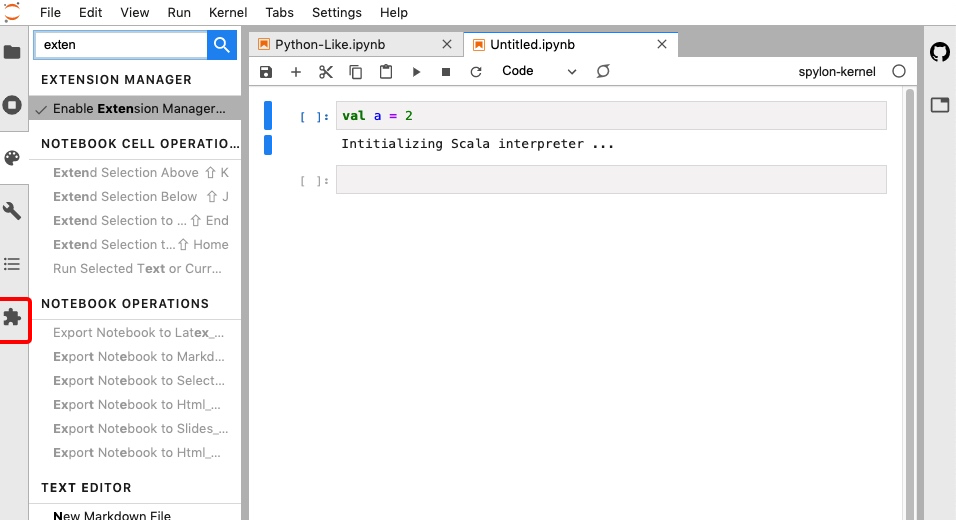
安装插件时,通常需要先通过 pip/conda 安装相关依赖,再通过 jupyter labextension 来安装对应插件,部分插件在成功安装之后需要重启 jupyter-lab 才能生效。建议只安装必要的插件,插件过多会拖慢 jupyter-lab 的打开速度。

kite —— 代码补全

kite 是一个功能非常强大的代码补全工具,目前可用于 Python 与 javascript,为许多知名的编辑器譬如 Vs Code、Pycharm 提供对应的插件,详细的安装过程可以参考Jupyter lab 最强代码补全插件

安装

安装 kite 的一般步骤:

  1. 下载安装 kite 客户端:安装后登陆 kite 客户端,并保持 kite 客户端开启;
  2. 配置 jupyter-lab:需要注意的是 kite 只支持 2.2.0 以上版本的jupyter lab,但是目前jupyter lab的最新正式版本为2.1.5,因此我们需要使用pip来安装其提前发行版本,这里我选择2.2.0a1;
1
2
3
4
5
6
7
8
# 升级 jupyterlab 到 2.2.0
$ pip install --pre jupyterlab==2.2.0a1

# 安装 jupyter-kite 依赖
$ pip install jupyter-kite

# 安装 @kiteco/jupyterlab-kite 插件
$ jupyter labextension install @kiteco/jupyterlab-kite

使用

成功安装 kite 后,会自动跳转到 kite 使用说明文档 kite_tutorial.ipynb,这里简单介绍 kite 的几项核心功能:

  • 自动补全:写代码的时候不需要按 健,也会弹出代码补全提示,可以在命令面板中通过 Kite: Toggle Docs Panel 来关闭或打开完整说明文档

  • 手动补全:仍然可以继续使用 jupyter-lab 本身的 补全功能

  • 实时文档:如果在 Kite 中打开了 Copilot,Copilot 会自动地根据光标在 Jupyter-lab 中的位置更新说明文档

jupyterlab_code_formatter —— 代码格式化

jupyterlab_code_formatter 用于代码一键格式化。

安装

1
2
3
4
5
6
7
# 安装依赖
$ conda install -c conda-forge jupyterlab_code_formatter
$ jupyter labextension install @ryantam626/jupyterlab_code_formatter
# 安装插件
$ jupyter serverextension enable --py jupyterlab_code_formatter
# 安装支持的代码格式
$ conda install black isort

使用

formatte

jupyterlab-go-to-definition —— 代码跳转

jupyterlab-go-to-definition 用于Lab笔记本和文件编辑器中跳转到变量或函数的定义

安装

1
2
3
4
# JuupyterLab 2.x
$ jupyter labextension install @krassowski/jupyterlab_go_to_definition
# JupyterLab 1.x
$ jupyter labextension install @krassowski/jupyterlab_go_to_definition@0.7.1

使用

默认快捷键 alt+click

click

jupyterlab-git —— 版本管理

jupyterlab-git 是 jupyter-lab 的 git 插件,可以方便地进行版本管理。

安装

1
2
$ conda install -c conda-forge jupyterlab jupyterlab-git
jupyter lab build

使用

previe

qgrid —— DataFrame 交互

qgrid 是一个可以用交互的方式操作 Pandas DataFrame 的插件,主要优点有:

  1. 直接用点选的方式进行选择、排序甚至是修改单元格中的值;
  2. 做 EDA 时可以看到整个 DataFrame 的全貌,而不是用 … 的方式来显示,而且读取速度很快;

安装

1
2
3
$ conda install qgrid
$ jupyter labextension install @jupyter-widgets/jupyterlab-manager
$ jupyter labextension install qgrid2

使用

  • 以交互的方式显示 Pandas DataFrame:可以显示完整数据
1
2
3
4
5
6
7
8
9
10
11
12
13
14
15
16
17
18
19
20
# 載入所需套件
import qgrid
import pandas as pd
import numpy as np

# 為了讓結果相同,設定種子以及資料數量
np.random.seed(1)
nrow = 1000000

# 建立 Dataframe
df = pd.DataFrame({'Index': range(nrow),
'Sex': np.random.choice(['M', 'F'], nrow),
'Age': np.random.randint(12, 56, nrow),
'Height': np.round(np.random.random(nrow),3)*30+160,
'Weight': np.round(np.random.random(nrow),3)*30+55,
'Tag': np.random.choice([True, False], nrow)})


qgrid_widget = qgrid.show_grid(df, show_toolbar=True)
qgrid_widget
  • 在 DataFrame 上排序、筛选数据:

Qgrid_basi

  • 甚至可以直接更改 Dataframe 的值:

Qgrid_tweakData

  • 还可以获取改动过的数据:qgrid_widget.get_changed_df() 可以获取经过筛选、排序、修改后的 DataFrame 数据:
1
qgrid_widget.get_changed_df()

filtering_demo

jupyter_bokeh —— 可视化效果

jupyter_bokeh 该插件可以在 Lab 中展示bokeh 可视化效果。

安装

1
2
3
conda install -c bokeh jupyter_bokeh
jupyter labextension install @jupyter-widgets/jupyterlab-manager
jupyter labextension install @bokeh/jupyter_bokeh

使用

boek

jupyterlab-dash —— 单独面板

jupyterlab-dash 该插件可以在Lab中展示 plotly dash 交互式面板。

安装

1
2
$ conda install -c plotly -c defaults -c conda-forge "jupyterlab>=1.0" jupyterlab-dash=0.1.0a3
$ jupyter labextension install jupyterlab-dash@0.1.0-alpha.3

使用

dash

jupyterlab_variableinspector —— 变量显示

jupyterlab_variableinspector 可以在 Lab 中展示代码中的变量及其属性,类似RStudio中的变量检查器。你可以一边撸代码,一边看有哪些变量。对 Spark 和 Tensorflow 的支持需要解决依赖。

安装

1
$ jupyter labextension install @lckr/jupyterlab_variableinspector

使用

early_demo

jupyterlab-system-monitor —— 资源监控

jupyterlab-system-monitor 用于监控 jupyter-lab 的资源使用情况。

安装

1
2
$ conda install -c conda-forge nbresuse
$ jupyter labextension install jupyterlab-topbar-extension jupyterlab-system-monitor

使用

默认只显示内存使用情况:

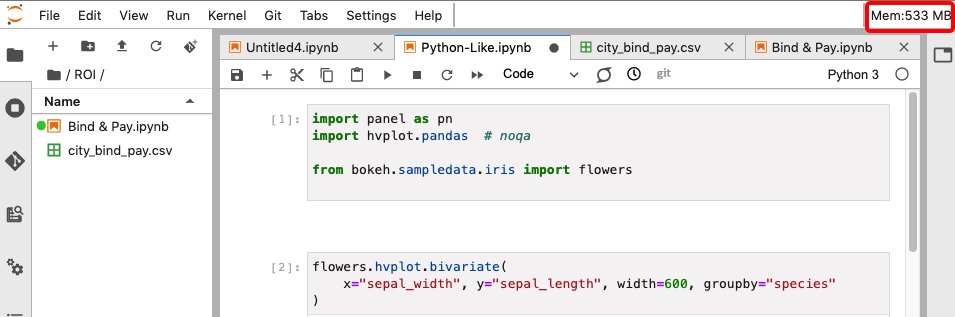
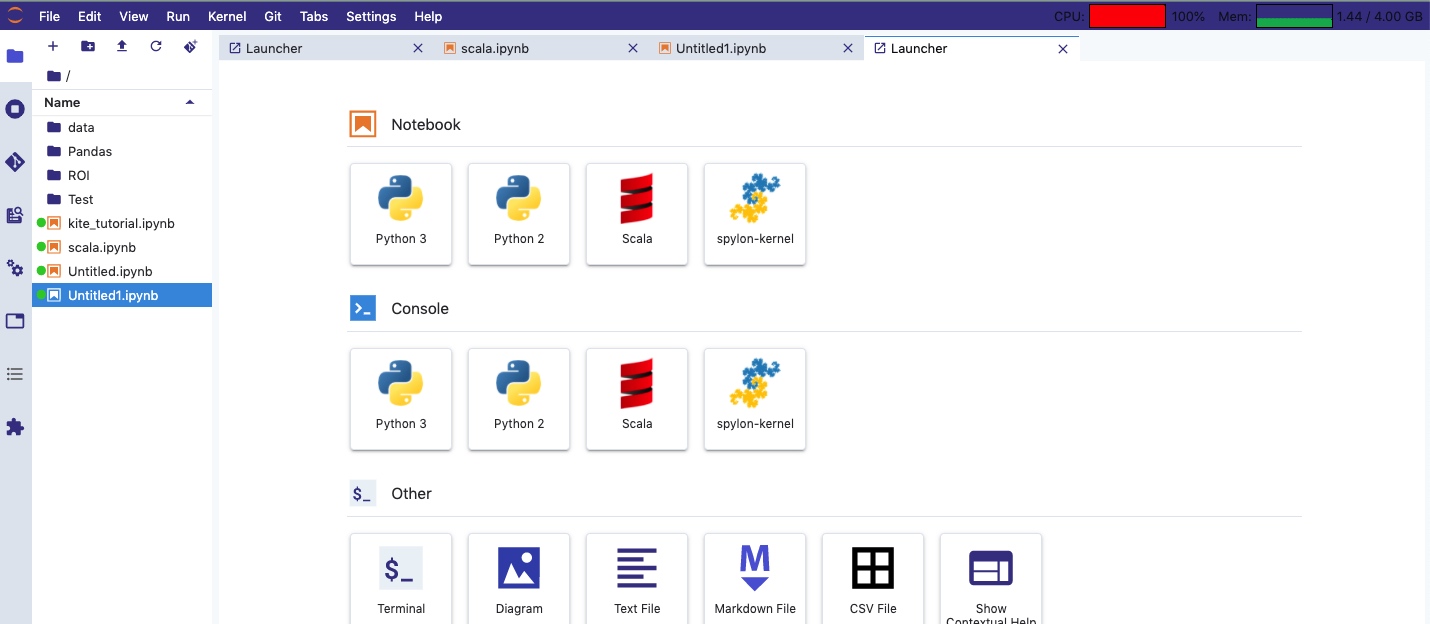
编辑配置文件 ~/.jupyter/jupyter_notebook_config.py:添加一下内容,重启 jupyter-lab 就可以显示 CPU 利用率以及内存使用情况了。

1
2
3
4
5
6
7
8
c = get_config()

# memory
c.NotebookApp.ResourceUseDisplay.mem_limit = <size_in_GB> *1024*1024*1024

# cpu
c.NotebookApp.ResourceUseDisplay.track_cpu_percent = True
c.NotebookApp.ResourceUseDisplay.cpu_limit = <number_of_cpus>

示例:

1
2
3
4
# 示例:限制最大内存 4G,2 个 CPU,显示 CPU 利用率
c.NotebookApp.ResourceUseDisplay.mem_limit = 4294967296
c.NotebookApp.ResourceUseDisplay.track_cpu_percent = True
c.NotebookApp.ResourceUseDisplay.cpu_limit = 2

screencast

jupyterlab-toc —— 显示目录

jupyterlab-toc 用于在 jupyter-lab 中显示文档的目录。

安装

1
$ jupyter labextension install @jupyterlab/toc

使用

to

Collapsible_Headings —— 折叠标题

Collapsible_Headings 可实现标题的折叠。

安装

1
$ jupyter labextension install @aquirdturtle/collapsible_headings

使用

Demo2

jupyterlab_html —— 显示 HTML

该插件允许你在Jupyter Lab内部呈现HTML文件,这在打开例如d3可视化效果时非常有用

安装

1
$ jupyter labextension install @mflevine/jupyterlab_html

使用

example1

jupyterlab-drawio —— 绘制流程图

jupyterlab-drawio 可以在Lab中启用 drawio 绘图工具,drawio是一款非常棒的流程图工具。

安装

1
$ jupyter labextension install jupyterlab-drawio

使用

drawio

jupyterlab-tabular-data-editor —— CSV 编辑

jupyterlab-tabular-data-editor 插件赋予我们高度的交互式操纵 csv 文件的自由,无需excel,就可以实现对csv表格数据的增删改查。

安装

1
$ jupyter labextension install jupyterlab-tabular-data-editor

使用

showcase

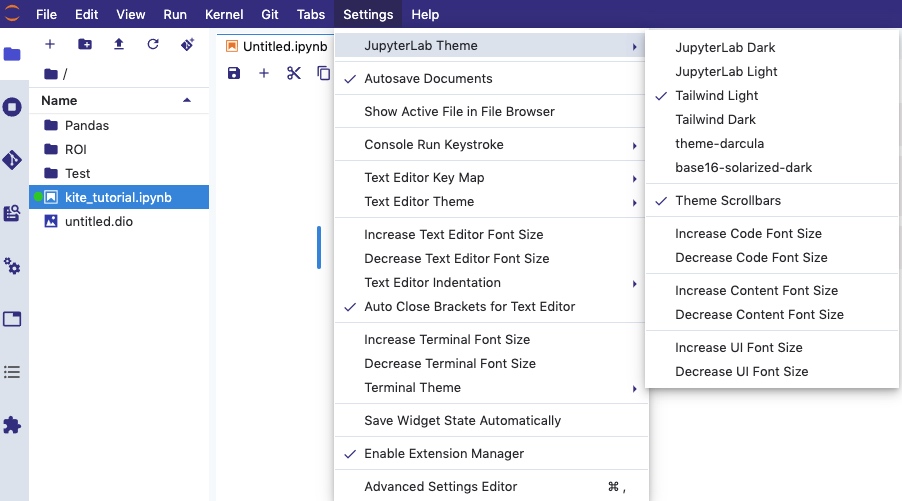
jupyter-themes —— 切换主题

jupyterlab-themes 用于切换 jupyter 的主题。

安装

1
2
# 目前还只能一个一个安装
$ jupyter labextension install @arbennett/base16-{$themename}

使用

更多插件

更多插件可以参考以下网站:

  1. Awesome JupyterLab
  2. 15个好用到爆炸的Jupyter Lab插件

kernel 管理

Jupyter kernel 可以用任何语言实现,只要它们遵循基于 ZeroMQ 的 Jupyter 通信协议。IPython 是最流行的内核,默认情况下包括在内。这并不奇怪,因为 Jupyter(Jupyter,Jupyter,Python,R)来自IPython项目。它是将独立于语言的部分从IPython内核中分离出来,使其能够与其他语言一起工作的结果,现在有超过100种编程语言的内核可用。

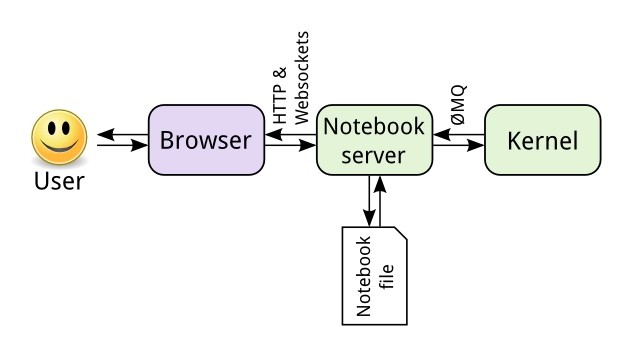
除了内核和前端之外,Jupyter 还包括与语言无关的后端部分,它管理内核、笔记本和与前端的通信。这个组件称为Jupyter服务器。笔记本存储在.ipynb文件中,在服务器上以Json格式编码。基于Json的格式允许以结构化的方式存储单元输入、输出和元数据。二进制输出数据采用base64编码。缺点是,与基于行的文本格式相比,json使diff和merge更困难。您可以将笔记本导出为其他格式,如Markdown、Scala(仅包含代码输入单元格)或类似本文的HTML。

1
2
3
4
# 查看 kernel 列表
jupyter kernelspec list
# 卸载指定 kernel
jupyter kernelspec remove kernel_name

安装 Scala kernel

在Scala中对Jupyter的支持是怎样的?实际上有很多不同的内核。但是,如果仔细观察,它们中的许多在功能上有一定的局限性,存在可伸缩性问题,甚至已经被放弃。其他人只关注Spark而不是Scala和其他框架。

其中一个原因是,几乎所有现有内核都构建在默认REPL之上。由于其局限性,他们对其进行定制和扩展,以添加自己的特性,如依赖关系管理或框架支持。一些内核还使用sparkshell,它基本上是scalarepl的一个分支,专门为Spark支持而定制。这一切都会导致碎片化、重用困难和重复工作,使得创建一个与其他语言相当的内核变得更加困难。

关于一些原因的更详细讨论,请查看 Alexandre Archambault 在2017年 JupyterCon 上的演讲 Scala: Why hasn’t an Official Scala Kernel for Jupyter emerged yet?

almond(推荐)

almond(之前叫jupyter-scala) 使得 jupyter 强大的功能向 Scala 开放,包括 Ammonite 的所有细节,尽管它还需要一些更多的集成和文档,但是它已经非常有用,并且非常有趣。
——Interactive Computing in Scala with Jupyter and almond

安装 almond 需要特别注意 almond 版本、Scala 版本以及 Spark版本之间的兼容性(almond 0.10.0 支持 scala 2.12.11 and 2.13.2 支持 park 2.4.x),almond 详细安装过程及版本对应关系请参考 almond 官方文档

1
2
3
4
5
6
7
8
9
10
11
12
13
14
15
16
17
18
19
20
21
22
23
24
25
26
27
# 查看可用的 Scala 版本
$ brew search scala
==> Formulae
scala scala@2.11 scala@2.12 scalaenv scalapack scalariform scalastyle

# 安装 scala 2.12.x
$ brew install scala@2.12

# 查看实际安装的 scala 版本
$ scala -version
Scala code runner version 2.12.11 -- Copyright 2002-2020, LAMP/EPFL and Lightbend, Inc.

# 安装 coursier,scala 的依赖解析器
$ brew install coursier/formulas/coursier

# 通过 coursier 安装 almond,指定 almond 版本=0.10.0,scala版本=2.12.11,重复安装需要加--force
$ coursier launch --fork almond:0.10.0 --scala 2.12.11 -- --install --force

# 成功安装后,可以看到 jupyter kernelspec 多了一个 Scala 的核
$ jupyter kernelspec list
Available kernels:
scala /Users/likewang/Library/Jupyter/kernels/scala
python3 /Users/likewang/opt/anaconda3/envs/mylab/share/jupyter/kernels/python3
python2 /usr/local/share/jupyter/kernels/python2
spylon-kernel /usr/local/share/jupyter/kernels/spylon-kernel

# 安装 Spark 依赖

配置 Spark:

1
2
3
4
5
6
7
8
9
10
11
12
13
14
15
16
17
18
# Or use any other 2.x version here
import $ivy.`org.apache.spark::spark-sql:2.4.0`

# Not required since almond 0.7.0 (will be automatically added when importing spark)
import $ivy.`sh.almond::almond-spark:0.10.9`
# 通常,为了避免污染单元输出,您需要禁用日志记录
import org.apache.log4j.{Level, Logger}
Logger.getLogger("org").setLevel(Level.OFF)
# 引入 NotebookSparkSession
import org.apache.spark.sql._

val spark = {
NotebookSparkSession.builder()
.master("local[*]")
.getOrCreate()
}
# 引入隐式转换
import spark.implicits._

其他 Scala kernel

  • spylon-kernel 是一个 Scala Jupyter Kernel。
  • jupyter-scala 依赖于 scala 2.11.x,还不支持 2.12;jupyter-scala 只能用于 jupyter notebook 无法用于 jupyter lab:

安装 python kernel

由于我们是在 python 3 虚拟环境下安装了 jupyter lab,自带的是 python 3 kernel,现在需要添加 python 2 的 kernel:

1
2
3
4
# 假设已经安装了名为 python2 的虚拟环境,切换到 python 2 环境
$ conda activate python2
# 安装 python 2 kernel
$ python2 -m ipykernel install --name python2

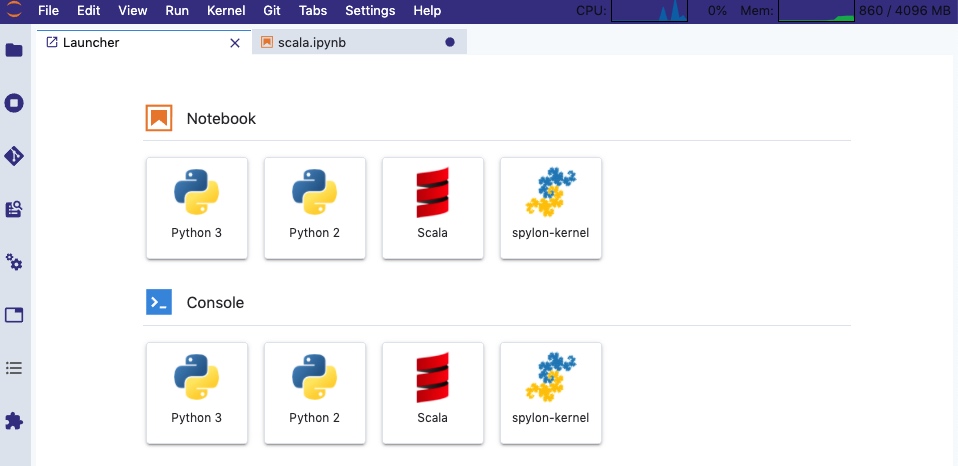
安装成功后,在 jupyter lab 新建文件页面会出现 python 2 的图标:

各种奇怪的问题

插件同时出现在已安装和未安装列表中

  • 问题描述:在uninstall 插件后,插件同时出现在 Known labextensions 和 Uninstalled core extensions。
1
2
3
4
5
6
7
8
9
10
11
12
13
14
15
(base) ➜  ~ jupyter labextension list
JupyterLab v1.2.6
Known labextensions:
app dir: /Users/likewang/opt/anaconda3/share/jupyter/lab
@bokeh/jupyter_bokeh v1.2.0 enabled OK
@jupyterlab/github v1.0.1 enabled OK
@jupyterlab/toc v2.0.0 enabled OK
@mflevine/jupyterlab_html v0.1.4 enabled OK
@pyviz/jupyterlab_pyviz v0.8.0 enabled OK
@ryantam626/jupyterlab_code_formatter v1.1.0 enabled OK
jupyterlab-dash v0.1.0-alpha.3 enabled OK
jupyterlab-drawio v0.6.0 enabled OK

Uninstalled core extensions:
@ryantam626/jupyterlab_code_formatter
  • 解决办法:删除 jupyter\lab\settings\build_config.json,https://github.com/jupyterlab/jupyterlab/issues/8122
1
2
3
4
5
6
7
8
9
10
11
12
13
14
15
16
(base) ➜  ~ jupyter lab build
[LabBuildApp] JupyterLab 1.2.6
[LabBuildApp] Building in /Users/likewang/opt/anaconda3/share/jupyter/lab
[LabBuildApp] Building jupyterlab assets (build:prod:minimize)
(base) ➜ ~ jupyter labextension list
JupyterLab v1.2.6
Known labextensions:
app dir: /Users/likewang/opt/anaconda3/share/jupyter/lab
@bokeh/jupyter_bokeh v1.2.0 enabled OK
@jupyterlab/github v1.0.1 enabled OK
@jupyterlab/toc v2.0.0 enabled OK
@mflevine/jupyterlab_html v0.1.4 enabled OK
@pyviz/jupyterlab_pyviz v0.8.0 enabled OK
@ryantam626/jupyterlab_code_formatter v1.1.0 enabled OK
jupyterlab-dash v0.1.0-alpha.3 enabled OK
jupyterlab-drawio v0.6.0 enabled OK

No module named ‘jupyter_nbextensions_configurator’

  • 问题描述:启动 jupyter-lab 时报错 ModuleNotFoundError: No module named 'jupyter_nbextensions_configurator'
1
2
3
4
5
6
7
8
9
10
11
(mylab) ➜  ilab jupyter-lab
[W 19:37:20.086 LabApp] Error loading server extension jupyter_nbextensions_configurator
Traceback (most recent call last):
File "/Users/likewang/opt/anaconda3/envs/mylab/lib/python3.7/site-packages/notebook/notebookapp.py", line 1670, in init_server_extensions
mod = importlib.import_module(modulename)
File "/Users/likewang/opt/anaconda3/envs/mylab/lib/python3.7/importlib/__init__.py", line 127, in import_module
return _bootstrap._gcd_import(name[level:], package, level)
File "<frozen importlib._bootstrap>", line 1006, in _gcd_import
File "<frozen importlib._bootstrap>", line 983, in _find_and_load
File "<frozen importlib._bootstrap>", line 965, in _find_and_load_unlocked
ModuleNotFoundError: No module named 'jupyter_nbextensions_configurator'
  • 解决办法:以上问题出现在虚拟环境中启动 jupyter-lab,jupyter-nbextensions_configurator 和 python pip 不在同一个环境,解决办法是在对应的虚拟环境中安装 jupyter_nbextensions_configurator
1
2
3
4
5
6
7
8
9
10
11
12
(mylab) ➜  ~ which jupyter-nbextensions_configurator
/Users/likewang/opt/anaconda3/bin/jupyter-nbextensions_configurator
(mylab) ➜ ~ which python
/Users/likewang/opt/anaconda3/envs/mylab/bin/python
(mylab) ➜ ~ which jupyter
/Users/likewang/opt/anaconda3/envs/mylab/bin/jupyter
(mylab) ➜ ~ which jupyter-notebook
/Users/likewang/opt/anaconda3/envs/mylab/bin/jupyter-notebook
# 重新在虚拟环境安装 jupyter_nbextensions_configurator
conda install -c conda-forge jupyter_nbextensions_configurator
(mylab) ➜ .jupyter which jupyter-nbextensions_configurator
/Users/likewang/opt/anaconda3/envs/mylab/bin/jupyter-nbextensions_configurator

参考

坚持原创技术分享,您的支持将鼓励我继续创作!